Time for the second part of the Breakout tutorial. Unfortunately it took longer than expected due to some issues I found while trying to realize the correct movements of the Ball; now it should be sufficiently similar to the original that I feel confident to publish this second part :D
After part 1 we left our Ball bouncing higher and higher on the Paddle, without end; the first thing we will do today is to create a playing field to constrain the Ball’s movements.
Add a New ▶ GameObject and call it “GameArea”; add a New ▶ Graphics ▶ SpriteRenderer and, like we did with the Paddle, set its properties as follows:
- set Rect to [-200, -300, 400, 600]
- set SharedMaterial to Default\Material\SolidWhite (grab it from the Project View)
- the ColorTint can be left white (RGB 255, 255, 255)
Next, we need to add a New ▶ Physics ▶ RigidBody so that it will be able to keep our Ball inside it.
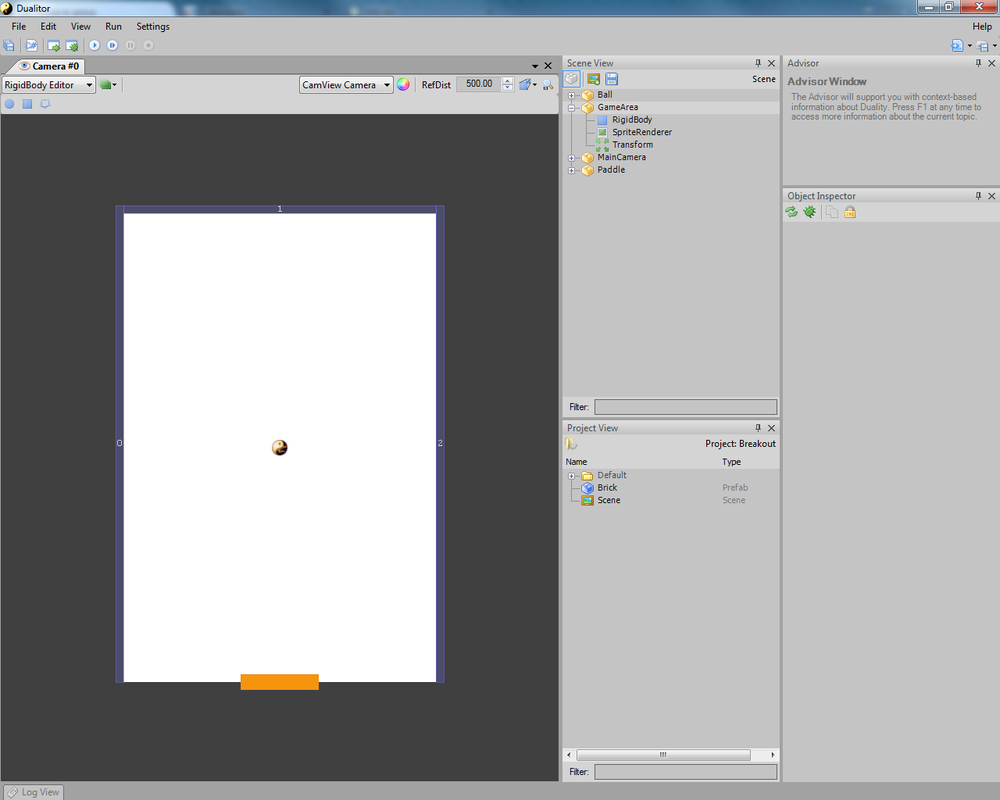
To do it, we will create an upside-down ‘U’-shaped RigidBody around the sprite; this way, the white area becomes the play area and the “blackness” around it, is an impenetrable wall. So go to the RigidBody Editor and remove the circle: since RigidBodies’ Shapes cannot be concave, we will have to add 3 rectangles around the perimeter, as displayed in the picture below. Again, it’s not important to place the vertices in the exact places at start; what’s important is that the left, top and right sides are covered.

If you want to check, I used the following vertices:
-
[-200, 300], [-210, 300], [-210, -310], [-200, -310]
-
[-200, -310], [200, -310], [200, -300], [-200, -200]
-
[200, -310], [200, 300], [210, 310], [210, -310]
Finally, set AngularDamping, Friction and LinearDamping to 0, Restitution to 1 and the BodyType to Static, click Play, and we are back to our Ball bouncing, with the difference that now, now sooner or later, it will hit the top of the GameArea and will bounce back to us.
For the next point, we will add some manner of control to our Paddle; so let’s go back to your IDE and add a new class, calling it “InputController”.
We have two choices to respond to key presses: one is to attach to OpenTK’s events, the other is to test the keys we are interested in during the update phase; for this tutorial, we will use the latter.
Make the newly generated class derive from Component and explicitly implement ICmpUpdatable; this time though, instead of accessing our Paddle GameObject by name, as we did for the Ball’s collision handler, we will add a reference to the Paddle ’s GameObject directly inside the code: this is to avoid to have to call a Scene.FindGameObject function every time we need to move the Paddle. For the Ball’s collision management it was acceptable to test the name of the GameObject that triggered the collision, since in the event’s handler arguments we were already being passed the GameObject colliding itself.
In addition to the Paddle GameObject, we will also need to define some other properties: another GameObject, this time for holding a reference to the Ball, and two floats: one for the PaddleSpeed, and the other for the InitialSpeed of our Ball (you will see why later).
Now we have to edit the ICmpUpdatable.OnUpdate method in order to perform the following:
- pressing the Left arrow key, we will move the Paddle to the left
- pressing the Right arrow key, we will move the Paddle to the right (duh)
- pressing Space will launch the Ball and start the game
The last point is necessary because from now on the Ball will not be moving at the start but wait the player’s command; in addition, the Ball will not be subject anymore to gravity but continue moving on its current direction until something is hit.
The function to test if a key is currently pressed is DualityApp.Keyboard.KeyPressed(OpenTK.Input.Key)
The full source code of InputController is as follows:
In the code, you can notice the following:
- I used a secondsPassed variable which is set to Duality.Time.LastDelta / 1000: this is used in order to move the Paddle taking into account the different times taken to manage each single frame (update + draw); the movement is then calculated based on the time past since the last update. Frames might take longer or shorter times but in the end our Paddle will move always by PaddleSpeed units/second.
- While checking if Space was pressed, I also added the condition that LinearVelocity is equal to 0.0: this is to ensure that the Ball will start moving only if it is not currently moving (i.e. at the beginning of the game)
Once compiled, we need to add our New ▶ Breakout ▶ InputController to the Scene. For convenience, I tend to add “general” components to the Camera, but that’s only my style; nothing stops
you from creating a new GameObject to hold this component.
After adding the new component somewhere in the Scene, we need to link the Paddle and Ball GameObjects by assigning them to the InputController using the editor (just drag the Paddle and Ball GameObjects from the Scene View to the InputController’s Object Inspector). Set the PaddleSpeed and BallInitialSpeed to values like 400.0 (wich means the Paddle will be able to move from one end of the GameArea to the other in 1 second) and 5.0.
Lastly, select the Ball’s RigidBody and check IgnoreGravity; click Play and finally we start to see some more interaction with the player: the Ball will be in the middle of the field, and as soon as you press Space, it will start moving towards the bottom. Using the Left and Right keys will make the Paddle move in the desired direction.
This is all good, until you click Play and notice two things:
- the Ball is always bouncing perfectly vertical and
- if you forget to catch the Ball, it goes by and gets lost somewhere in the depths of the world
So the next things to do are: first, to have the Ball change its trajectory depending on where it hit the Paddle; to do this we will have to alter directly the Ball’s RigidBody’s LinearVelocity vector instead of relying on the usual physics mechanics.
I wanted to have the ball leave the Paddle with an angle of +/- 45 degrees, centered on y+ axis, depending on the position of the Ball relative to the center of the Paddle. See the code below for implementation and description.
Second, we need to make it so that if the Ball goes past our Paddle, it should be put back at the starting position, ready to be launched again. For this we need to make our Ball component implement ICmpUpdatable.OnUpdate in order to test if its Transform.Pos.Y coordinate is enough to be considered out of the GameArea. Since we know already where
this limit is set (the Paddle’s center sits at Y = 300, and it’s 20 pixels tall), we can just test the coordinate against a hardcoded
value (310 in our case).
As you can notice, PaddleImpulse now needs to be a 1.XX value, since we are not applying a impuse to the Ball upon contact, but we are affecting directly the velocity vector.
For the last time, click Play and enjoy playing around!
This concludes part 2 of the Breakout tutorial. The final part should be ready (for real this time) in a few days and will introduce bricks, end game conditions and scoring.